Can you build an affordable GNSS reference station and join the DATIS project Onocoy? Yes, you can. Should you? Well that depends on how willing you are to try some ‘do it yourself’ work. There are more ‘plug and play’ options available for sure, but they can be quite pricy. For a more cost-effective solution you can consider acquiring some cheaper components and putting something together yourself. The purpose of this post is to give step by step instructions for one specific set of hardware. Please learn more about DIY Onocoy stations first to help you decide what kind of DIY station you want to build. With this build, you should be capable of at least 80% of Onocoy Rewards.
- Raspberry Pi 4 B (In my case, I have repurposed a Finestra Helium Hotspot*)
- AK314-2 UM980 Receiver Module
- CH341A USB to I2C / IIC / SPI / UART / TTL / ISP adapter
- Wiring
- Beitian Antenna BT-800S Full Band
- Coaxial cable to connect the antenna to the receiver with SMA male on one end and N-Male on the other. You can get this on AliExpress or somewhere else. Price will depend on the quality and length of cable.
*If you install the Crankk image, you can continue to earn helium as well as Crankk and ThingsIX. The Pi can run all of these things together, no problem.
The parts in this list should run you between US$280 and US$380 depending on how you get the Pi and what length of cable you need. I have seen Pi based helium miners on eBay for as low as US$25. If you already have an antenna (for example you are already participating in GEODNET), you can get the below instead of the antenna noted above and save the cost of the antenna and cabling.
You will also need a Windows PC to run the configuration software.
Step 1
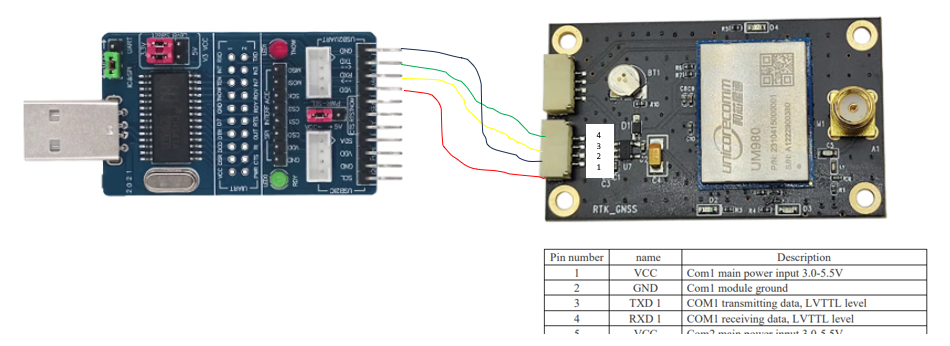
The first step was to connect the receiver to the USB adapter. Make sure you are using the UART connections and not I2C. You may need to get creative here as the ‘wiring’ in the parts list doesn’t have the proprietary connectors for the AK314-2 (UPDATE: The ‘Wiring’ link is now for wiring with the proper connector, so no splicing needed). However, you can easily connect the wires and although not as pretty, will work fine.
NOTE – There is now a USB dongle available, so you can avoid having to connect the adapter. However, this has not been tested.

Step 2
Download/install the UPrecise software on a Windows PC. This software will allow you to communicate to the receiver and send commands.
Step 3
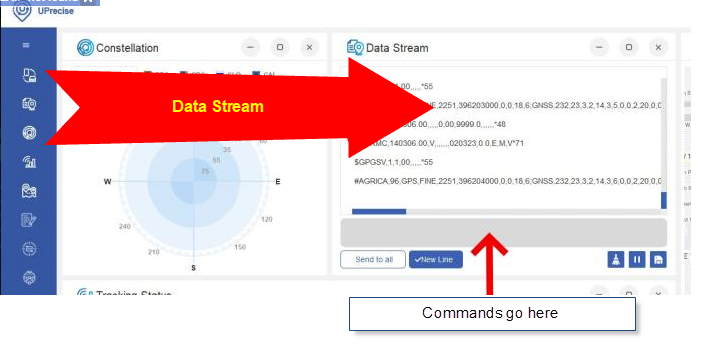
Plug the USB adapter into the Windows PC where you installed the UPrecise software. You will need to find out what COM port the device is on in your device. You can open the device manager in Windows and find the COM port it is using (e.g. COM3). In the ‘Connections’ section of UPrecise, enter the serial port you found and a baud rate of 115200 (this is the default of the AK314). Click OK.
You should now see data in the Data Stream (note we have not hooked up the antenna yet, so no satellites will show).
Enter the following commands in the command entry box ONE by ONE, hitting enter key each time to send the command. You should see the command in the window and an OK after it’s received.
mode base time 60 2 2.5
CONFIG SIGNALGROUP 2
rtcm1005 30
rtcm1006 30
rtcm1033 1
rtcm1074 1
rtcm1077 1
rtcm1084 1
rtcm1087 1
rtcm1094 1
rtcm1097 1
rtcm1117 1
rtcm1124 1
rtcm1127 1
Saveconfig
You can now remove the USB adapter from Windows PC.
Step 4
You need to create an account and get credentials from Onocoy. Refer to the Onocoy documentation if you need help. Once you are set up, note the generated username and password. Then go to the reference station tab and grab the mount point. You will need these later
Step 5
Now to prepare the Raspberry Pi. Full details on setting up the ntrip server for onocoy can be found at this link. A step by step summary of how I did it can be found below.
Install minicom software
sudo apt-get install minicomInstall socat software (this is useful later)
sudo apt-get install socatInstall the ntripserver software using git
git clone https://github.com/nunojpg/ntripserver.gitChange the directory
cd ./ntripserverBuild the program using the ‘make’ command
make
Step 6
Now connect your antenna to the receiver. I you are splitting with GEODNET, unplug GEODNET station and add antenna to middle connector on the splitter, and connect the left and right connectors to the GEODNET station and your AK314 Receiver using pigtails.

Step 7
Plug everything back in and plug your USB adapter into the Pi. Follow the instructions for configuring your ntrip server for onocoy.
Once completed, you can use the following command as sanity check to make sure there is data being broadcast
screen /dev/ttyUSB0 115200Step 8
It’s recommended that you create a service so the ntrip server starts on reboot (just in case). Instructions for setting up this service can be found here. If you are less familiar with linux commands and editing with nano, you can follow the step-by-step instructions here.
sudo nano /etc/systemd/system/ntripserver.serviceUse nano to enter this text. Replace /path/to/ntripserver with the actual path to your ntripserver executable.
[Unit]
Description=NTRIP Server Service
After=network.target

[Service]
ExecStartPre=/bin/sleep 15
ExecStart=/path/to/ntripserver -M 1 -i /dev/ttyUSB0 -b 115200 -O 1 -a servers.onocoy.com -p 2101 -m {{mountpointhere}} -n {{usernamehere}} -c {{passwordhere}}
Restart=always
User=root

[Install]
WantedBy=default.target
Write the file (Control+O) and then exit nano (Control+X).
Now enable the service
sudo systemctl enable ntripserver.servicesudo systemctl start ntripserver.serviceCheck it by entering
sudo systemctl status ntripserver.serviceStep 9
Check the onocoy console. You should see that you are sending data and the station is being validated. For more on validation check read this on onocoy documentation site
Step 10
If you need to send new commands to the receiver, we can do that with socat. First, run socat on the pi by entering:
sudo socat tcp-listen:128,reuseaddr /dev/ttyUSB0,b115200,raw,echo=0
Then open up UPrecise on a Windows PC on the same network. In the connections, select TCP/IP, enter the IP address of the Pi and port 128. You should see the Data Stream again and can send commands as before.

Useful Links
- https://simeononsecurity.ch/other/onocoy-gps-gnss-reciever-basestation-on-a-budget/
- https://docs.onocoy.com/documentation/quick-start-guides/get-gnss-correction-data
- https://en.unicorecomm.com/assets/upload/file/Unicore_Reference_Commands_Manual_For_N4_High_Precision_Products_V2_EN_R1_1.pdf
- https://en.unicorecomm.com/assets/upload/file/UM980_User_Manual_EN_R1_11.pdf
- https://en.unicorecomm.com/assets/upload/file/UPrecise%20V1.0.639.exe